Since returning to school to pursue a graduate degree, I barely have any time to eat let alone cook! Instant Pot to the rescue! This magical little device lets me throw FROZEN chicken in and have a ready-to-eat meal in ~ 30-40 minutes. The best part? During that 30 to 40 minutes, I do not have to actively slave away in the kitchen. ( I honestly love cooking, but between grading 80 undergraduates homework and tests, plus my own research and school work the hours in the day, week, and month are swamped!)
To compensate for this lack of time, and still maintain a healthy diet I turn to meals that will last several days. In comes soups, stews, jambalaya, stir fry, etc
One of my favorites is this Thai Spicy Chicken Soup.
I adapted this recipe from heather christo: her recipe is semi-vegetarian (does not use any meats, but does use chicken broth) I add in the curry paste and ginger when I have it on hand, but its not a typical pantry item and I find that this recipe is full of flavor without it!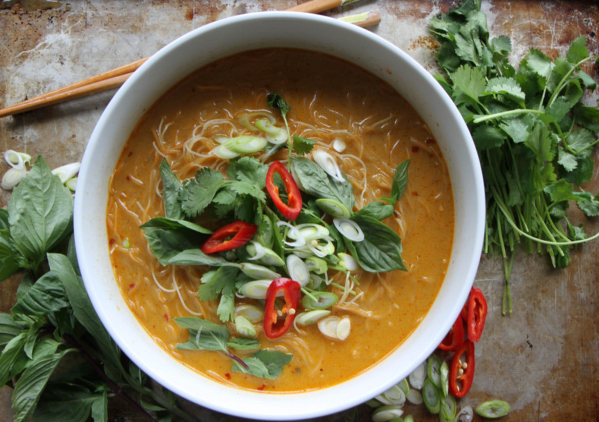
photocred: https://heatherchristo.com/spicy-thai-curry-noodle-soup/
Ingredients:
- I like things SPICY so I use ~ a mixture of 5-6 jalapenos and chili peppers.
- Two cloves of garlic
- Two bunches of green onions
- a Handful of baby bell peppers OR 2 bell peppers–the red and green ones are my favorite. does that make me basic?
- Two tables spoons of sriracha sauce
- A splash of soy sauce to add to your bowl right before eating
- cooked rice of stir-fry noodles to serve the soup on top.
- A squeeze of lime juice (fresh lime) or a squirt of lime juice (bottled lime juice usually <$2.00)
- One can of coconut milk you can use lite or regular coconut milk.
- Three chicken breasts, fat removed to make this vegetarian do not add chicken!
- if you want to add in an extra layer of dimension you can use miso paste. Add this to your broth for a full flavor body.
***THIS IS NOT A NECESSARY STEP, BUT I LIKE TO ADD IN ANY ASSORTED “STIR-FRY” VEGETABLES I HAVE LAYING AROUND….TYPICALLY a handful of shredded carrots or 3-4 full sized CARROTS, BUT COULD BE MUSHROOMS, ZUCCHINI, BROCCOLI, CAULIFLOWER, CABBAGE ETC***
DIRECTIONS:
- Turn on your instant pot and hit saute.
- Roughly chop ~90% of the spicy peppers (jalapenos or chili peppers), 90% of the sweet peppers (baby bell peppers or regular bell peppers), 1 bunch of the green onions (with the stringy root ends and tops trimmed), 2 cloves of garlic (skinned removed–I do this by smashing the garlic with the flat side of my knife)
- USE A FOOD PROCESSOR OR IMMERSION BLENDER TO PUREE ALL OF THE ROUGHLY CHOPPED INGREDIENTS.
- Then add in any extra “stir-fry” vegetables to the food processor.
- Add ~1 tablespoon of oil to the instant pot. I use olive oil since it is what I typically have on hand, but I have used peanut oil in the past
- Then if the chicken is fresh add it to the instant pot and brown each side– approximately 2 minutes each side. If the chicken is frozen ignore this step!*
- Add the pureed mixture from step 3. Saute for approximately 2 minutes. Basically, until you can start to smell the aroma coming from the instant pot. Do not put your head directly over the instant pot, the spicy fumes from the peppers can “burn” your nostrils and eyes
- At this step add in your frozen chicken *
- Then add in enough water to cover the chicken breasts
- Hit “cancel/ keep warm” on the instant pot.
- Then hit “manual” and set for 30 minutes. Place the lid on top and lock. Make sure the vent is closed to allow for the pressure to build.
- Go take a break! Watch your favorite show, shower! Or anything else you desire while the instant pot cooks your delicious meal!
- One the time has elapsed, either open up the vent to quickly release the pressure or allow the pressure to release “naturally” the natural way takes at least 10 minutes while the quick release takes ~ 3 minutes
- One the pressure has been released open up the instant pot, remove the chicken and place into a separate bowl and shred it. This can be done with a pair of forks or if you wish you can use a kitchen aid with the mixer attachment to shred it–takes less than a minute but can sometimes shred it TOO much. I prefer to shred my chicken with forks instead.
- Now add the can of coconut milk to the instant pot as well as 2-4 cups of water (this depends on how thick your puree was and if you like the texture of a soup or a thicker consistency more), set the instant pot back to saute and allow to return to a boil.
- I like to add in 1/2 of my remaining peppers at this stage, cut into short strips or slices. This adds a nice mixture of texture and color
- Once the chicken is shredded, add it to the instant pot
- Once the soup has returned to a boil you are done! It is dinner time.
- Serve the soup over a bowl of rice or stir-fry noodles. Squeeze a bit of lime juice and a splash of soy sauce to each bowl.
- Garnish with green onions and a mixture of slices of fresh bell peppers and spicy peppers (jalapenos or chile peppers)
I get lazy with my leftovers and store the ENTIRE instant pot in the fridge after it has cooled. You can purchase silicone lids to cover the pot or use aluminum foil
 My wonderful fiance popped the question! We both recieved our undergraduates in Biochemistry from the same university and proceeded to work at the same company. We started as classmates, progressed to lab partners, turned into friends, which led to coworkers. We saw each other at our worst, heartbroken from previous relationships, but were always there for each other. Supporting each other. I never imagined I would end up with this wonderful man. My mom saw it and told me the second after she met him back in 2013 that she wished I would date him. I didn’t see it, he was my friend, one of my closest friends. and if I am completely honest, NOTHING like the guys I had previously been with. Eventually, he won me over and moved out of the friendzone.
 He had asked me several weeks…maybe even months previously what my ring size was…I told me what the last sizing I had was….surprisingly I either had remembered my ring size incorrectly or I went through a chubby phase (which did happen) and lost the weight in my FINGERS! My beautiful engagement ring barely stayed on my finger and even when on my finger would turn sideways. As is evident from the photo below of our first night engaged.
 In August 2016 we moved out of state to both pursue graduate degrees.